PowerPC 405 Assembly
Demonstrating PowerPC assembly and the GCC toolchain with Linux on Xilinx Virtex-4 FPGAs.
Warning
This document was originally written for the arch/ppc/ tree of Linux. This tree went away and is being replaced by arch/powerpc/. When reading this article, please bear in mind that any references to arc/ppc/ are out of date.
Warning
This article is not a beginner-level tutorial. It presumes that you have some familiarity with the PowerPC architecture and some experience with Linux and GCC. This article explains how to use objdump, how certain (older?) versions of Linux on the Xilinx PowerPC boot, and a few other tricks.
Author: David Baird
Created on: 2008 February 22
Last update: 2008 August 6
Kernel Source Code
Xilinx recently (November 2007) began hosting up-to-date kernel sources, patched with Xilinx drivers, at git.xilinx.com. See the announcement here:
http://www.mail-archive.com/linuxppc-embedded@ozlabs.org/msg28690.html
So far, I have been able to get the xps_ll_temac and xps_uartlite peripherals to work without any headaches.
In the Linux tree (circa Jan 2008), there are 3 PowerPC trees under arch:
ppc/
For 32-bit PowerPC architectures. This is planned to be removed in Summer 2008. For example, see the announcement: "Reminder: removal of arch/ppc" by Kumar Gala.
ppc64/
For 64-bit PowerPC architectures. Eliminated circa linux-2.6.15.
powerpc/
Added circa linux-2.6.15. This is an attempt to unify the ppc and ppc64 trees. However! This unification is not yet complete and so, currently, the ppc tree must still be used for the Virtex-4 devices (and probably some other devices as well).
When compiling Linux for the Virtex-4, you must use:
# This is the new way (circa July 2008):
make ARCH=powerpc
# This is the old way:
make ARCH=ppc
Kernel Disassembly
PowerPC disassembling proved especially useful when I initially was trying to make the kernel boot. After building the kernel, there are two files you can dump:
powerpc-oplinux-linux-objdump -d vmlinux > vmlinux.d
powerpc-oplinux-linux-objdump -d arch/ppc/boot/images/zImage.elf > zImage.d
Then, you can use XMD (the debugging tool from Xilinx EDK) to set breakpoints and step through code. Note that the addresses in vmlinux.d are not physical addresses (they are virtual addresses). Therefore, you might need to add or subtract some value from the addresses to convert to physical.
PowerPC Assembly
Reference materials:
ug011.pdf "PowerPC Processor Reference Guide" (Highly recommended reading!!!!!!!!!! You can find it via Google.)
The PowerPC 405 uses 32-bit instructions and has 32-bit registers. Because instructions are constrained to 32-bits, you can only load 16-bit immediates. Thus, loading 32-bit immediates requires two instructions and results in code that looks like this:
// Load immediate shifted: r3 <- 0x1234 << 16
lis r3,      0x12345678@h
// Or immedate:            r3 <- r3 | 0x5678
ori  r3, r3, 0x12345678@l

// Another possibility:
addi r3, r3, 0x12345678@l
The GNU compiler supports syntax where @h and @l select the high and low 16-bit portions of a 32-bit number.
Unlike the x86 architecture, there is no register designated to be a stack pointer on the PowerPC. It appears that GCC is delegating general purpose register r1 to the role of stack pointer.
The "link register" (LR) is often used to contain the next instruction to execute after returning from a subroutine. Therefore, many subroutines calls look like this:
main:
    // bl: store next instruction pointer in LR,
    //     then branch to my_subroutine
    bl my_subroutine
    // b .: infinite loop
    b .

my_subroutine:
    // ... do some stuff ...
    // blr: branch to the address stored in LR
    blr
If the subroutine needs a stack (e.g. to push the LR so it can call another subroutine) Stack operations probably look like this:
my_subroutine:
    // stwu: store with update:
    //       push the stack pointer (r1) and then update the stack pointer
    // mflr: move from LR (and store into r0)
    // stw: store word: Push LR (which contains the return address)
    stwu r1, -32(r1)
    mflr r0
    stw  r0, 36(r1)

    // ... do some stuff ...

    // Pop LR
    // mtlr: move to LR (from r0)
    // blr: return!
    lwz r0, 36(r1)
    mtlr r0
    blr
PowerPC Assembly: Simplified Mnemonics
Reference materials:
ug011.pdf Appendix C: Simplified Mnemonics
Simplified mnemonics can be confusing because it might appear to be a discrepancy between the source code and the binary.
If a discrepancy is noticed between the assembly source code wrote and the binary which objdump disassembles, it might be because the assembly used a full mnemonic, but objdump is using a simplified mnemonic.
For example, here are simplified mnemonics for TLB instructions:
Mnemonic                Simplified Mnemonic
--------                -------------------
tlbwe r4,r0,TLB_DATA    tlbwelo r4,r0
tlbwe r3,r0,TLB_TAG     tlbwehi r3,r0
For more information, see ug011.pdf (as listed at the top of this section).
PowerPC Assembly: Switching to Virtual Mode
The Linux kernel uses a clever trick to kick the PowerPC system into virtual mode (the PowerPC starts up in "real mode") (this is found in arch/ppc/kernel/head_4xx.S):
turn_on_mmu:
  lis r0,MSR_KERNEL@h
  ori r0,r0,MSR_KERNEL@l
  mtspr SPRN_SRR1,r0
  lis r0,start_here@h
  ori r0,r0,start_here@l
  mtspr SPRN_SRR0,r0
  SYNC
  rfi       /* enables MMU */
  b .     /* prevent prefetch past rfi */
The rfi is a "return from interrupt" instruction. Return from interrupt has the effect of restoring the Machine State Register (MSR) from the contents of SRR1 (which is loaded with the value of MSR_KERNEL). The address to return to is located in SRR0 (which is loaded with start_here). So, the effect of the rfi is essentially this:
- Load MSR_KERNEL into the MSR register (this enables virtual mode)
- Branch to start_here (but now in virtual mode)
The value of the MSR_KERNEL contains the IR and DR bits which correspond to "instruction address translation" and "data address translation".
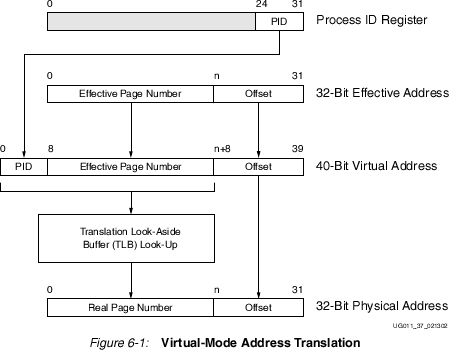
When in virtual mode, addresses are computed use Translation Lookaside Buffers (TLBs), as shown in the following picture (borrowed without permission from Xilinx from ug011.pdf Chapter 6 - fair use ^_^):
Before the above code (turn_on_mmu) can execute, however, there is some setup which must be performed in advance: the TLBs must be setup to map virtual addresses into physical address. Here is a more complete overview of what happens:
_GLOBAL(_start)
    bl  initial_mmu
turn_on_mmu:
    // (see above)

initial_mmu:
    tlbia     /* Invalidate all TLB entries */
    isync

    <load KERNELBASE virtual address into r3
     and KERNELBASE physical address into r4>

    iccci r0,r3     /* Invalidate the i-cache before use */

    /* Load the kernel PID.
     */
    li r0, 0
    mtspr SPRN_PID, r0
    sync

    clrrwi  r4,r4,10    /* Mask off the real page number */
    ori r4,r4,(TLB_WR | TLB_EX) /* Set the write and execute bits */

    clrrwi  r3,r3,10    /* Mask off the effective page number */
    ori r3,r3,(TLB_VALID | TLB_PAGESZ(PAGESZ_16M))

    li      r0,63       /* TLB slot 63 */

    tlbwe r4,r0,TLB_DATA    /* Load the data portion of the entry */
    tlbwe r3,r0,TLB_TAG   /* Load the tag portion of the entry */
PowerPC Assembly: Reconstructing the Link Registers
- Jump to the current LR
- Figure out the shift to r1 and the location where LR was pushed on the stack (see the stuff about stacks work in the PowerPC_Assembly section)
- Read LR from the stack
- Remove the shift from r1 and jump to the new LR
- Goto 2.
The Linux Boot Sequence
The zImage.elf file is composed of two parts:
- The compressed Linux kernel
- A bootloader: code which initializes some basic subsystems and then decompresses the Linux kernel into RAM and starts executing it
The bootloader follows this sequence of steps:
Execution starts at the top of arch/ppc/boot/simple/head.S
Contains the following patch:
#if defined(CONFIG_XILINX_VIRTEX_4_FX)
  /* PPC errata 213: only for Virtex-4 FX */
  // NOTE: 0 means the same thing as r0 here:
  mfccr0  0
  oris    0,0,0x50000000@h
  mtccr0  0
#endif
Branch to relocate in arch/ppc/boot/simple/relocate.S
relocate calls load_kernel in arch/ppc/boot/simple/misc-embedded.c
load_kernel:
Calls serial_init (found in arch/ppc/boot/simple/uartlite_tty.c) to setup the uartlite
Calls embed_config (in arch/ppc/boot/simple/embed_config.c)
Invalidates the data cache:
__asm__("mfdccr %0": "=r" (dccr));
if (dccr == 0) {
  for (addr = 0;
       addr < (congruence_classes * line_size);
       addr += line_size) {
    __asm__("dccci 0,%0": :"b"(addr));
  }
}
Establishes some configuration variables:
bd->bi_memsize = XPAR_DDR_0_SIZE;
bd->bi_intfreq = XPAR_CORE_CLOCK_FREQ_HZ;
bd->bi_busfreq = XPAR_PLB_CLOCK_FREQ_HZ;
bd->bi_pci_busfreq = XPAR_PCI_0_CLOCK_FREQ_HZ;
Prompts the user for a kernel command line (the Linux/PPC load: prompt)
Calls gunzip to decompress the kernel at address 0x00000000
Back in relocate, branch to the freshly decompressed kernel at address 0x00000000:
li  r9,0
mtlr  r9
blr
The kernel is now running:
Starts from the top of arch/ppc/kernel/head_4xx.S
Calls initial_mmu to setup the TLBs
Continues to turn_on_mmu which puts the system into virtual mode and then branches to start_here (but now starting at a virtual address instead of a physical address)
start_here
- Calls early_init (arch/ppc/kernel/setup.c) which zeros the .bss section and some other things
- Calls machine_init (arch/ppc/kernel/setup.c) and MMU_init (arch/ppc/mm/init.c)
- Surprise: Takes the system out of virtual mode (i.e. puts it back into real mode), and branches (via SRR0 and rfi) to the proceeding "2:" label (but in real mode now)
- XXX: Configures the TLBs or what???
- Turns virtual mode back on and branches to start_kernel (init/main.c)
Toolchain Tricks: Disassembling
Say you do a memory dump in XMD (e.g. mrd 0x0 4) and you get the following data which you want to disassemble:
9421FFF0
90610008
9161000C
3C600005
Save this into a file foo.hex and then disassemble it into foo.d:
xxd -r -p foo.hex > foo.bin
powerpc-eabi-objdump -EB -b binary -m powerpc -D foo.bin > foo.d
The -EB option for objdump means "Big Endian." The resulting foo.d should look like this:
00000000 <.data>:
   0:       94 21 ff f0     stwu    r1,-16(r1)
   4:       90 61 00 08     stw     r3,8(r1)
   8:       91 61 00 0c     stw     r11,12(r1)
   c:       3c 60 00 05     lis     r3,5
Toolchain Tricks: Debugging C++
c++filt will read in a mangled string that looks like this:
_ZN5boost6detail8function26void_function_obj_invoker0INS_6lambda14lambda_functorINS3_19lambda_functor_baseINS3_6actionILi4ENS3_15function_actionILi4ENS3_6detail11unspecifiedEEEEENS_6tuples5tupleIKM4LEDsFvmmERSE_KiSJ_NSC_9null_typeESK_SK_SK_SK_SK_EEEEEEvE6invokeERNS1_15function_bufferE
and produce a C++ string that looks like this:
boost::detail::function::void_function_obj_invoker0<boost::lambda::lambda_functor<boost::lambda::lambda_functor_base<boost::lambda::action<4, boost::lambda::function_action<4, boost::lambda::detail::unspecified> >, boost::tuples::tuple<void (LEDs::* const)(unsigned long, unsigned long), LEDs&, int const, int const, boost::tuples::null_type, boost::tuples::null_type, boost::tuples::null_type, boost::tuples::null_type, boost::tuples::null_type, boost::tuples::null_type> > >, void>::invoke(boost::detail::function::function_buffer&)